


Power outages disrupt household routines without warning, leaving heating blowers, food storage, and water systems cold and inoperable. Knowing %how to hook up a portable generator to a house% transforms a standalone machine into a reliable lifeline for your electrical service panel. Selecting the right connection equipment ensures that high-draw appliances like well pumps and refrigeration compressors start smoothly without dangerous makeshift wiring. Homeowners often rely on robust 7000-watt portable generators to bridge unexpected grid failures during severe winter blizzards and summer storms.
Connecting a secondary power source requires strict adherence to safety clearances and utility backfeed isolation standards. Utilizing dedicated hardware such as mechanical panel interlocks or manual transfer switches eliminates the catastrophic dangers associated with illegal suicide cords. A proper connection also prevents hazardous line backfeeding, safeguarding utility linemen who work tirelessly to restore downstream grid power. Investing in code-compliant connection equipment provides dependable peace of mind while ensuring your family stays secure throughout extended outages.

Pros
- Bundles generator cord, outdoor inlet box, interlock bracket, and matching 30A 2-pole breaker in one purchase
- Enables flexible circuit selection across the entire breaker panel rather than limiting users to fixed circuits
- ETL-certified 15-foot generator cord provides essential reach to position engine exhaust away from home openings
- Built specifically for common 150A, 200A, and 225A Square D Homeline residential service panels
Cons
- Strictly incompatible with other electrical panel brands such as Siemens, Eaton, GE, or Square D QO series
- Does not include the building wire, conduit, or interior fittings needed between the outdoor inlet box and the breaker panel
- Requires opening the main electrical panel for installation, which demands electrical knowledge or a licensed electrician
The LiftCharger 30 Amp Generator Hook-Up Kit is a generator connection and transfer bundle designed for U.S. homeowners looking to safely connect a portable electric generator to residential electrical panels. Specifically tailored for Square D Homeline 150, 200, and 225-amp load centers, this kit provides the essential hardware needed to deliver backup electricity during storm outages and grid failures. By integrating a mechanical interlock directly onto your existing service panel, the kit creates a code-compliant barrier that physically prevents utility power and generator power from being energized at the same time.
This connection bundle is rated for a continuous current of 30 amps, matching portable generators with continuous ratings between 3,500 and 7,500 running watts and surge ratings between 4,000 and 8,500 starting watts. Unlike rigid multi-circuit transfer switches that permanently lock you into six or ten pre-selected circuits, an interlock system lets homeowners manage electrical distribution across the entire panel. As long as total active electrical loads remain within your portable generator's rated running wattage and startup surge capacity, you can manually switch on critical breakers such as refrigeration, well pumps, gas furnace blowers, or lighting circuits as outage needs change.
The LiftCharger package includes four key components: an outdoor weatherproof 30-amp power inlet box, an ETL-certified 15-foot 30-amp generator power cord, a mechanical interlock plate, and a Square D Homeline-compatible 30-amp two-pole circuit breaker. The 15-foot heavy-duty cord establishes the necessary distance to position a fuel-burning portable generator safely away from the home's exterior walls, windows, and doors. Meanwhile, the weather-resistant exterior power inlet box protects the electrical prongs from outdoor moisture, dust, and debris when mounted to an exterior wall.
Deploying this system requires mounting the inlet box outside, running appropriate in-wall building wire to the indoor breaker panel, installing the included 30-amp 2-pole breaker in the top slots, and mounting the metal interlock bracket. During an outage, the interlock forces the user to manually shut off the utility main breaker before flipping on the generator breaker, eliminating the lethal hazard of utility backfeeding. Because fuel-burning generators release dangerous carbon monoxide, the supplied 15-foot cord assists in maintaining outdoor placement, though homeowners must always position generators far from living areas and never operate an engine indoors or in an attached garage.
While the kit bundles essential hardware, buyers must recognize that it does not provide the building wire, conduit, or fittings required to link the outdoor inlet box to the indoor service panel. In addition, the mechanical interlock bracket is strictly engineered for Square D Homeline panels rated from 150 to 225 amps, meaning it will not fit Square D QO panels or load centers made by Siemens, Eaton, or GE. Homeowners must also actively monitor their energy usage, as a 30-amp setup cannot power central air conditioning, electric ranges, or whole-house heating simultaneously on a portable generator.
The LiftCharger 30 Amp Hook-Up Kit is an economical and practical solution for homeowners who already own a 3,500 to 7,500-watt portable generator and have a compatible Square D Homeline electrical panel. It eliminates messy webs of indoor extension cords while preserving panel-level circuit flexibility during emergency power outages. Buyers with panels from other manufacturers, those requiring 50-amp utility connections for larger generators, or those uncomfortable working inside a service panel will need alternative hardware or professional electrician assistance.
Verifying panel compatibility is critical before purchasing the LiftCharger kit. The included mechanical interlock bracket and two-pole 30-amp breaker are specifically designed for Square D Homeline 150-amp, 200-amp, and 225-amp main breaker load centers. The mechanism relies on the exact spacing between the main service disconnect handle and the top branch breaker positions. Panels from other brands, such as Siemens, Cutler-Hammer, Square D QO, or GE, feature different handle dimensions and spacing that prevent this interlock from operating safely.
Installation requires running field-supplied conduit and copper building wire, typically 10 AWG copper conductors for a 30-amp circuit, between the exterior power inlet box and the breaker panel. The included Homeline 30-amp breaker must be mounted in the designated position adjacent to the main service breaker so the interlock slider can physically restrict movement. Because this process involves working inside an energized panel enclosure, homeowners lacking advanced electrical skills should hire a licensed electrician to perform the installation and ensure local building code compliance.
Operating a home backup system using an interlock kit requires following a strict, deliberate startup sequence. When utility power fails, switch off all branch circuit breakers inside your panel, slide the mechanical interlock plate to mechanically lock out the main utility breaker, and switch on the 30-amp generator breaker. After starting your portable generator outdoors and connecting the 15-foot power cord to the inlet box, you can systematically turn on individual household breakers one by one to prevent excessive inrush current from overloading the generator.
Safe power management depends on matching household electrical consumption to the running wattage and starting surge capacity of your portable generator. With a 30-amp connection supporting generators from 3,500 to 7,500 running watts, priority should be given to essential survival loads such as refrigerators, freezers, internet modems, lighting, and heating zone pumps. Never operate your portable generator near open doors, windows, or intake vents, and always utilize carbon monoxide alarms inside the home to maintain family safety during power outages.
A Practical Technical Guide to Connecting a Portable Generator to Your Home Panel
Establishing a secure link between an emergency engine and a residential load center demands methodical planning and code-compliant electrical hardware. When severe weather downs utility lines, homeowners need an efficient method to energize interior lighting, water heating, and food preservation. Bypassing standard electrical infrastructure with haphazard extension cords through open doorways creates thermal, physical, and atmospheric hazards. A permanent exterior inlet paired with a certified panel interlock provides an organized, safe distribution channel for continuous backup power.
Eliminating Utility Backfeeding and Dangerous Connection Shortcuts
Direct backfeeding through a standard wall receptacle or dryer outlet using a dual-ended male cord is exceptionally hazardous and illegal in every jurisdiction. These makeshift configurations, often called suicide cords, expose live metal prongs with lethal line voltage whenever the engine runs. Power supplied this way can also flow backward through your utility transformer, stepping up to thousands of volts on neighborhood distribution lines. This unintended backfeeding presents fatal electrocution risks to utility linemen working on presumed dead cables down the street.
Mechanical isolation ensures that emergency secondary power and primary utility service can never occupy your electrical bus bars at the same time. The National Electrical Code requires a positive mechanical break that isolates your home from the utility grid before generator power can enter the panel. Certified transfer equipment guarantees this physical disconnection, preventing destructive phase collisions when grid utility power abruptly restores. Relying on code-approved interlock plates or double-throw transfer switches remains the only acceptable foundation for household generator connectivity.
Comparing Mechanical Panel Interlock Kits to Traditional Transfer Switches
Traditional manual transfer switches isolate a pre-selected group of individual household circuits inside a separate sub-panel enclosure. While reliable, this approach restricts your power access strictly to those hardwired circuits during a blackout, requiring expensive installation labor and extensive rewiring. If you suddenly need to run an unselected circuit like a basement sump pump or an attic ventilation fan, a traditional switch offers zero operational flexibility. Dedicated sub-panels also occupy considerable wall space adjacent to your main breaker box, which can complicate retrofits in compact utility rooms.
A mechanical breaker interlock kit installs directly on your existing load center, offering dynamic power distribution across your entire panelboard. Complete packages like the LiftCharger 30 Amp Generator to House Hook-up Kit for Square D Homeline panels allow users to manually choose which branch breakers to energize. A precision-engineered sliding metal plate prevents the generator breaker and the main utility disconnect from being switched on concurrently. This configuration enables homeowners to route running wattage dynamically across any room in the house as long as overall electrical capacity is not exceeded.
Calculating Surge Wattage, Continuous Output, and Generator Sizing
Successful home backup relies on matching your portable generator running and starting wattage to the cumulative demand of activated household appliances. Continuous running watts represent the ongoing power needed to keep resistive loads like incandescent lighting, heating elements, and electronic screens operational. Inductive loads equipped with electric motors, such as refrigerators and well pumps, demand brief burst currents known as starting surge watts. Failure to calculate this locked-rotor inrush current will trip generator overload breakers and stall small-displacement combustion engines.
A standard 30-amp generator hookup operating at 240 volts provides a practical ceiling of 7,200 continuous running watts. The LiftCharger connection kit is rated for 30 amps of current, pairing with portable generators producing 4,000 to 8,500 surge watts and 3,500 to 7,500 running watts. Homeowners deploying heavy-duty units or generators capable of running central air conditioners must balance high startup draws against continuous generator output limits. Furthermore, balancing branch circuits across both 120-volt stator legs prevents uneven thermal stress on the alternator windings.
Selecting Power Inlet Boxes, Cords, and Gauge Thickness
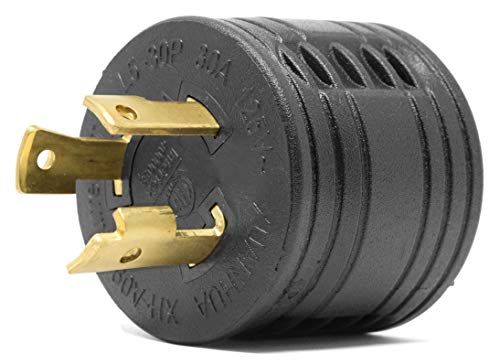
The exterior power inlet box serves as the permanent, weatherproof mounting point where generator output interfaces with home infrastructure. High-grade inlet enclosures feature spring-loaded gasketed covers that seal against driving rain, blowing snow, and intrusive debris when not in use. Inside the box, a heavy-duty NEMA L14-30P male flanged inlet receives the twist-lock female connector from your generator extension cable. Proper installation requires running appropriately sized electrical metallic tubing or conduit from the outdoor box directly into your service panel.
Cord construction and conductor wire gauge dictate how much voltage drop occurs over the distance between your generator and the house inlet. The LiftCharger system includes an ETL-certified 15-foot 30-amp generator cord featuring heavy-duty copper conductors shielded by durable, weather-resistant insulation. Utilizing an undersized extension cord causes substantial resistance, leading to dangerous heat buildup inside the jacket and severe voltage dips at your appliances. Maintaining a 10 AWG wire thickness for 30-amp loads minimizes line losses while ensuring sustained voltage stability for delicate microprocessors.
Managing Floating Neutral Versus Bonded Neutral Configurations
Understanding the distinction between a floating neutral and a bonded-to-frame neutral is vital when connecting portable equipment to residential service panels. In a standard household electrical panel, the neutral conductor bar and equipment grounding system are permanently bonded together at the main service disconnect. If your portable generator also features an internal frame-bonded neutral, you inadvertently create two separate neutral-ground bonding points in the system. This dual-bond scenario establishes parallel return paths, causing objectionable circulating ground current that can nuisance-trip sensitive GFCI breakers.
Most residential panel interlock installations require a portable generator configured with a floating neutral to maintain single-point bonding safety. When the neutral conductor floats inside the generator alternator, the home service panel remains the sole point of neutral-to-ground reference. This configuration ensures that all unbalanced return current travels back through the dedicated white neutral wire rather than through the protective green ground conductor. Checking your generator manufacturer schematics allows you to confirm bonding status or remove an internal bonding jumper when interfacing with residential transfer hardware.
Outdoor Placement Guidelines and Carbon Monoxide Safety Protocols
Combustion engines produce substantial amounts of odorless, colorless carbon monoxide gas that can incapacitate building occupants within minutes. Operating any fuel-burning generator inside a residential structure, basement, garage, carport, or covered breezeway is strictly unsafe under any circumstances. Even keeping garage doors open or attempting makeshift window exhaust piping fails to prevent lethal gas accumulation from infiltrating living quarters. Safe operation requires positioning the generator exclusively outdoors on a flat, level surface at a minimum distance of 20 feet from all building openings.
Engine placement must keep the hot exhaust muffler aimed downwind and away from windows, entry doors, soffit vents, and fresh air returns. When winter blizzards or severe rainfall threaten outdoor equipment, homeowners should use purpose-built, flame-resistant running covers or protective generator shed enclosures engineered with active ventilation baffles. Many modern portable engines feature integrated carbon monoxide monitoring modules complying with PGMA G300 or UL 2201 standards that automatically shut down ignition upon detecting ambient gas buildup. Installing battery-backed carbon monoxide alarms on every level of your home provides an essential secondary layer of life-safety protection.
Installing the Mechanical Interlock Plate and Dedicated Circuit Breaker
Installing a panel interlock kit requires working inside the main service panelboard, where lethal voltages remain present even when main breakers are open. Homeowners without certified electrical experience should hire a licensed electrician to handle panel modifications and conduit rough-ins. Before removing the metal panel deadfront cover, the main utility disconnect must be switched off, and proper personal protective gear should be worn. Always treat the primary utility service entrance lugs as live, as they remain energized ahead of the main breaker assembly.
The LiftCharger interlock kit includes a dedicated Square D Homeline 30-amp two-pole circuit breaker and an engineered metal sliding bracket. This breaker installs into the upper slots designated by the manufacturer directly adjacent to the main 150, 200, or 225-amp service disconnect. Wall conduit carries 10 AWG copper THHN conductors from the exterior power inlet box into this new double-pole breaker. Once mounted, the sliding steel plate smoothly prevents the generator breaker and the main utility disconnect from ever being switched on simultaneously.
Step-by-Step Starting Sequence and Power Transfer Execution
Executing a safe transfer sequence begins inside the home before the generator engine is even cranked into operation. First, walk over to your electrical load center and switch off the main utility disconnect handle completely. Next, switch off every individual branch circuit breaker in the panelboard, including lighting circuits, heating equipment, and standard wall outlets. Slide the mechanical interlock plate upward into its secondary position, which clears the mechanical lock over your new 30-amp generator breaker.
Move outside and position the portable generator at least 20 feet from the structure before plugging in the 4-prong twist-lock power cord. Connect the female end firmly into the exterior inlet box and twist it clockwise to lock the retention collar securely in place. Check engine oil levels and fuel reserves, open the fuel valve, set the choke, and start the engine using the recoil pull or electric starter. Allow the small engine to idle smoothly for two to three minutes so operating voltage and frequency stabilize at 120/240 volts and 60 Hz.
Staging Electrical Loads and Preventing Alternator Overload
Once the generator is running smoothly outdoors, return inside to the service panel and switch on the 30-amp generator double-pole breaker. At this point, both energized bus bars in your load center receive generator power, but no household circuits draw current because all branch toggles remain off. Begin energizing branch circuits sequentially, starting with the single largest inductive motor load your household requires. Activating heavy appliances like a refrigerator compressor or deep-well pump first ensures the generator has full surge capacity available to absorb locked-rotor inrush.
After motor-driven compressors settle into their steady running state, you can gradually switch on secondary convenience circuits like living room lighting and communication hardware. Keep high-draw resistive appliances like electric clothes dryers, water heaters, and central electric ovens switched off unless your generator has massive continuous capacity. Pay close attention to the audible tone of the small engine outside while toggling branch breakers inside the panelboard. If the engine bogs down, struggles, or emits dark exhaust smoke, switch off the most recently added circuit immediately to relieve alternator strain.
Safely Transferring Back to Grid Power and Post-Outage Shutdown
When neighborhood streetlights illuminate or utility line monitoring apps indicate that primary grid service has been restored, plan your transfer reversal methodically. First, switch off the 30-amp double-pole generator breaker inside your electrical panelboard to disconnect the generator from the bus bars. Slide the mechanical interlock plate downward to its primary position, physically locking the generator breaker in the off position while freeing the main disconnect. Switch the large main utility breaker back to the on position to re-energize your home with primary grid power.
Walk outside to the generator, disengage any onboard appliance breakers, and allow the engine to run without load for several minutes. This brief cool-down period allows circulating engine cooling air to dissipate residual heat from the stator windings and cylinder head. Switch the engine off, disconnect the heavy-duty twist-lock cord from both the inlet box and generator, and coil it neatly for indoor storage. Close the weatherproof inlet box cap firmly to guard against atmospheric moisture until the next unexpected emergency outage.
Routine System Verification, Multimeter Testing, and Engine Storage Maintenance
Periodic maintenance and electrical verification ensure your backup generation system functions flawlessly when severe weather strikes. Using a digital multimeter, you can test line voltage at the exterior inlet box or generator receptacles under light operational loads. Probing between neutral and either hot leg should display roughly 120 volts alternating current, while probing across both hot legs should indicate approximately 240 volts. Confirming that your generator maintains a steady line frequency near 60 Hz prevents microcontrollers in modern appliances from malfunctioning during emergency operation.
Combustion engines require active fuel management to prevent degraded ethanol gasoline from depositing gummy varnish inside small carburetor jets. Always treat fresh fuel with an approved stabilizing additive or run the carburetor float bowl completely dry before placing the machine into seasonal storage. Exercising the generator engine under a realistic electrical load every few months keeps internal seals lubricated and maintains residual magnetism within the alternator rotor. Following this comprehensive hookup process and diligent maintenance routine ensures your home stays protected, safe, and fully energized whenever the electrical grid fails.




Write Your Review
No reviews yet. Be the first to share your experience!